Interacting with the Version Tree
Version Tree View
The History button on the VisTrails toolbar lets users interact with a workflow history. It consists of a tree view in the center and the Properties tool container on the right for querying and managing version properties (Figure In History mode, you can examine and annotate different versions of a workflow.). Versions are displayed as ellipses in the tree view where the root of the tree is displayed at the top of the view. The nodes of the tree correspond to a version of a workflow while an edge between two nodes indicates that one was derived from the other.
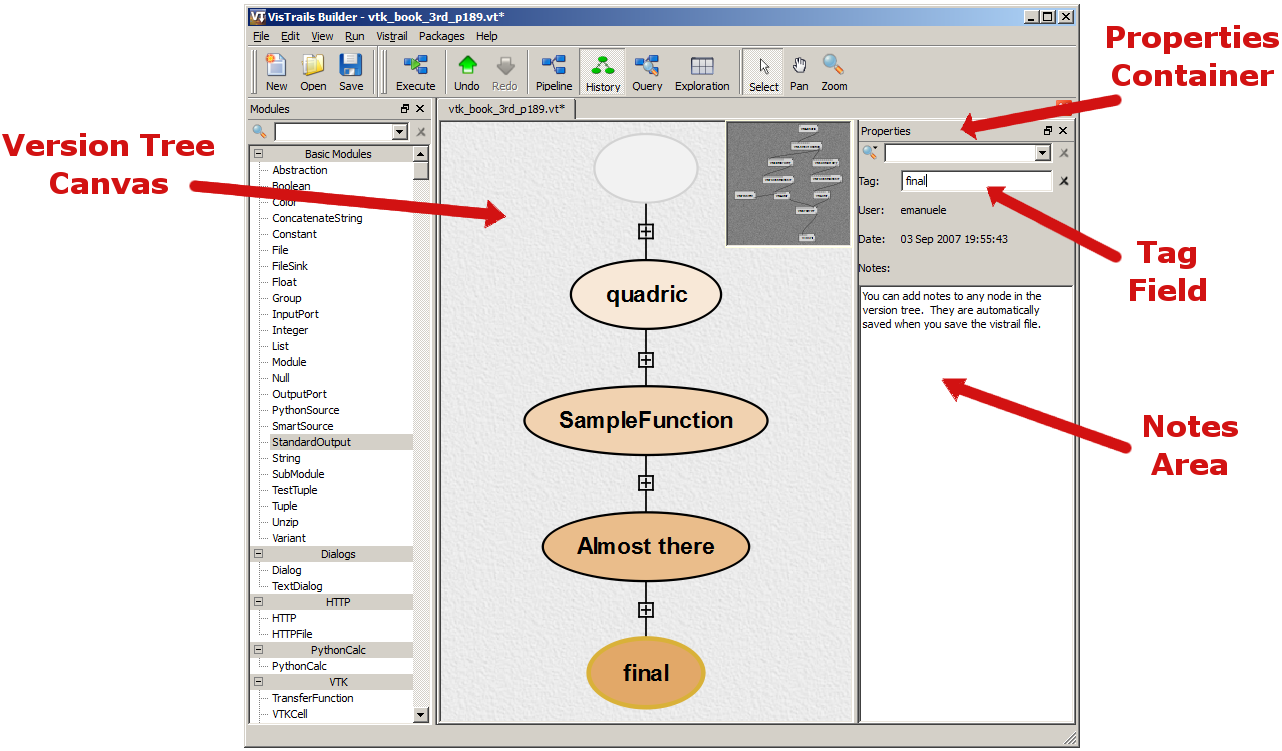
In History mode, you can examine and annotate different versions of a workflow.
The nodes are displayed as colored ellipses, and are either blue or orange. A blue color denotes that the corresponding version was created by the current user while orange nodes were created by other users. The brightness of each node indicates how recently a version was created; brighter nodes were created more recently than dimmer ones. Each node may also have a tag that describes the version, and this tag is displayed as a text label in the center of the ellipse of the corresponding version.
The nodes are connected by a solid line if the child node is a direct descendent of the parent node; that is, if you have made only a single change from the older version to the newer version. By default, only nodes that are leaves, have more than one child node, are specially tagged (see Section Adding and Deleting Tags), and the current version, will be displayed. To save space, other nodes will be “collapsed,” or hidden from view. Collapsed nodes are marked by the appearance of a small expansion button along an edge connecting two nodes (Figure To conserve space, linear sequences of non-tagged nodes may be hidden from view.). Clicking this button expands the version tree to reveal the hidden versions (Figure They can be restored by clicking on the expansion button, which resembles a plus sign (+) inside a small box.). The tree expansion is smoothly animated to help you maintain context from one view to the next. Clicking the button a second time collapses the nodes once again. Because most non-trivial changes to a workflow take more than action, most edges in a the version tree will be shown with these expansion buttons.
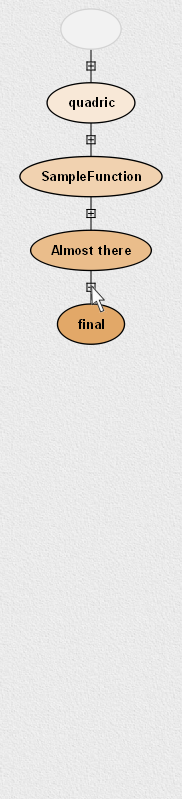
To conserve space, linear sequences of non-tagged nodes may be hidden from view.
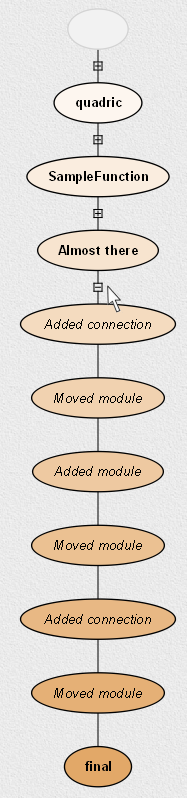
They can be restored by clicking on the expansion button, which resembles a plus sign (+) inside a small box.
Try it now!
To see an example of a version tree, load the example vistrail “vtk_book_3rd_p189.vt.” All versions will be shown in orange unless your username happens to be “emanuele.” Recall that this tree displays the structure of changes to a workflow, so let’s make some changes to see their effect on the version history. In the History view, select the node tagged Almost there, and then click on the Pipeline button to switch to a view of the workflow. Select a connection and delete it. Now, switch back to the History view, and notice that there is a new child node connected to Almost there. In addition, the line connecting the new node to its parent is solid, indicating that only a single change has been made. If we delete more connections, an expansion button would appear (Figure All versions created by other users are shown in orange.).

All versions created by other users are shown in orange.
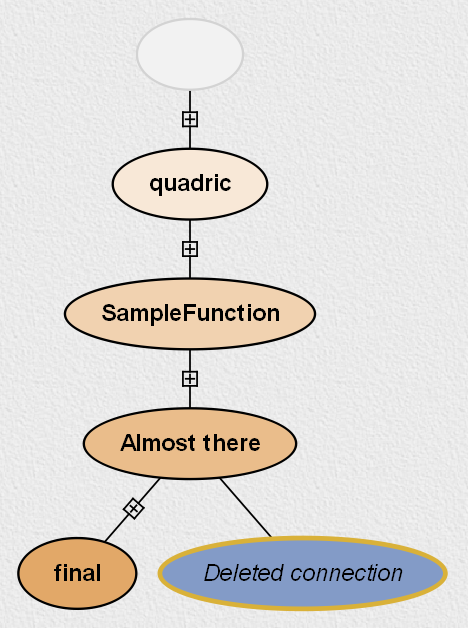
Deleting a connection results in a blue version connected by a solid line.
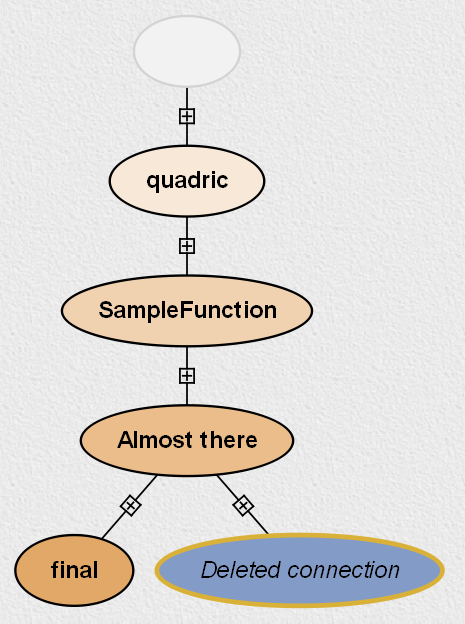
More interactions on this version cause additional versions to be created. To save space, these intermediate nodes are hidden, and an expansion button appears on the edge between the current node and the last tagged node.
Adding and Deleting Tags
As noted above, only certain nodes, including specially tagged ones, are shown by default in the version tree. To tag a version, simply click inside a selected node and type some meaningful text. The tag is created when you either click outside the node or press ‘Enter’. If you would like to change the tag to a different text, click inside the node again and modify the text as before. (Alternately, you can also create and modify tags using the Tag text field in the Properties container.)
Note that deleting all of the text in the tag field effectively deletes the tag. A second way to delete a tag is to click the ‘X’ button to the right of the text box. Removing a tag from a node may cause it to not be displayed in the default version tree view if it doesn’t satisfy any of the other criteria for display.
Adding Version Annotations
In addition to the tag field, the Properties container also displays information about the user who created the selected version and when that version was created. At the top of the container is a field for querying a vistrail; this functionality is described in detail in Chapter Querying the Version Tree. The final piece of the panel is the Notes field which allows users to store notes or annotations related to a version. As with tags, adding notes to a version is as easy as selecting the desired version and modifying the text field. Notes are automatically saved when you save the vistrail file.
Comparing Versions
While selecting versions in the History view and using the Pipeline view to examine each version is extremely useful, this approach can be cumbersome when trying to compare two different versions. To help with such a comparison, VisTrails provides a Version Difference mechanism for quickly comparing two versions. There are two ways to compute this difference. The first is to select two versions in the tree and choose Execute Version Difference from the Run menu. The easier method is to drag one version onto the other.
After either method, a Visual Diff window will open (see Figure A Visual Diff showing the difference between version z-space and version textureMapper.). The difference is displayed in a manner that is very similar to the pipeline view, but modules and connections are colored based on similarity. Dark gray indicates those modules and connections that are shared between the two versions; orange and blue show modules and connections that exist in one workflow and not the other; and light gray modules are those where parameters between the two versions differ. Clicking the Legend button will bring up a window to remind you what each color corresponds to. For a module that is colored light gray, clicking on the Parameter Changes button will bring up a window that shows the difference in parameters for that module.

A Visual Diff showing the difference between version z-space and version textureMapper.
Try it now!
To try out this feature, open the “lung.vt” example vistrail, and click the History button. Within the version tree, click and drag the z-space version to the textureMapper version. After the diff appears, click on the Show Parameter Inspector Window button, and then click on the vtkRenderer module to see the parameter differences. We can see that one of the changes from z-space to textureMapper was to add a black background. Figure A Visual Diff showing the difference between version z-space and version textureMapper. shows the result of this comparison.