Difference between revisions of "User:Tohline/vtk/SimpleCubeTutorial"
(Beginning to explain cube example) |
(→Minimalist Cube: Expand discussion of minimalist cube) |
||
| Line 33: | Line 33: | ||
1. Start from scratch: Generate the "tomato-colored" cylinder depicted in Figure "Cylinder01" by following the first two steps of the "Getting Started" example presented above. | 1. Start from scratch: Generate the "tomato-colored" cylinder depicted in Figure "Cylinder01" by following the first two steps of the "Getting Started" example presented above. | ||
[[Image:ModifiedPipeline.jpg|right|thumb|250px|Pipeline01]]2. Disconnect the "vtkCylinderSource" module from the pipeline, then add (and connect) the following two modules to the pipeline: "HTTPFile" and "vtkPolyDataReader". This is done by finding the names of these modules in the library list shown in the "Modules" segment of the VisTrails Builder Window, then highlighting, and dragging and dropping the modules into VisTrail's Pipeline widget. After doing this, the VisTrails pipeline should look like the one depicted here as Figure "Pipeline01". | [[Image:ModifiedPipeline.jpg|right|thumb|250px|Pipeline01]]2. Disconnect the "vtkCylinderSource" module from the pipeline, then add (and connect) the following two modules to the pipeline: "HTTPFile" and "vtkPolyDataReader". This is done by finding the names of these modules in the library list shown in the "Modules" segment of the VisTrails Builder Window, then highlighting, and dragging and dropping the modules into VisTrail's Pipeline widget. After doing this, the VisTrails pipeline should look like the one depicted here as Figure "Pipeline01". (If desired, the "vtkCylinderSource" module can actually be deleted from the Builder Window.) | ||
3. Go to the following website: [http://www.phys.lsu.edu/~tohline/vistrails/datafiles/SimpleCube_step01.vtk http://www.phys.lsu.edu/~tohline/vistrails/datafiles/SimpleCube_step01.vtk]. The information provided in this 20-line ASCII file — also displayed below as Figure "Minimalistic Cube ASCII File" — supplies the POINTS (vertices) and POLYGONS that are sufficient to define the wireframe model of a simple cube. The information in this file is identical to the first 20 lines of the example cube description shown in §15.3 (specifically, starting at the bottom of p. 331) of the [http://www.kitware.com/products/books/vtkguide.html ''VTK User's Guide'']. | |||
4. Click on the "HTTPFile" module in the newly modified pipeline, then drag the "url" method into the "Set Methods" segment of the VisTrails Builder Window. Type (or cut and paste) into the space allocated for the url "String," the full "SimpleCube_step01" web address, including the "http://" prefix, as identified in step #3 above. | |||
<div align="center"> | |||
<table border="1"> | |||
<tr> | |||
<td align="center"> | |||
'''Minimalistic Cube ASCII File''' | |||
</td> | |||
</tr> | |||
<tr> | |||
<td align="left"> | |||
<pre style="color:maroon;font-size:100%"> | |||
# vtk DataFile Version 2.0 | |||
Cube example | |||
ASCII | |||
DATASET POLYDATA | |||
POINTS 8 float | |||
0.0 0.0 0.0 | |||
1.0 0.0 0.0 | |||
1.0 1.0 0.0 | |||
0.0 1.0 0.0 | |||
0.0 0.0 1.0 | |||
1.0 0.0 1.0 | |||
1.0 1.0 1.0 | |||
0.0 1.0 1.0 | |||
POLYGONS 6 30 | |||
4 0 1 2 3 | |||
4 4 5 6 7 | |||
4 0 1 5 4 | |||
4 2 3 7 6 | |||
4 0 4 7 3 | |||
4 1 2 6 5 | |||
</pre> | |||
</td> | |||
</tr> | |||
</table> | |||
</div> | |||
Revision as of 01:31, 25 January 2014
Simple Cube Tutorial
Getting Started
As in §4.1 (p. 38) of the VTK User's Guide, authored and published by Kitware, Inc., we will start off by rendering a simple cylinder.
1. Inside VisTrails, open, then execute "Cylinder.vt" without making any changes to the default pipeline or to any module parameters:
- Follow this directory path: VisTrails/examples/vtk_examples/Rendering/Cylinder.vt
- Upon execution, the image that pops up in the VisTrails spreadsheet window will be totally orange (actually, the color is "tomato") and will not look like a cylinder. This is because the default position of the camera places you inside the tomato-colored cylinder.
- You can view the cylinder by placing your mouse cursor inside the relevant spreadsheet window and using the appropriate mouse control to "zoom out". Then other mouse actions will let you spin the cylinder and/or move it side to side.
2. Modify the initial camera position:
- Click on the "vtkCamera" module of the Cylinder.vt Pipeline; the "Methods" segment of the VisTrails Builder Window will list all of the methods that can be activated within the vtkCamera module.
- Note that, in the bottom half of this "Methods" window segment, the "Zoom" method has already been activated with a value of 1.5.
- Scroll through the list of methods to find the "SetPosition" method; highlight that method and drag it into the bottom half (Set Methods) segment of the Methods window; three blank "Float" slots will appear, allowing you to enter floating-point numbers to specify, respectively, the <math>x</math>, <math>y</math>, and <math>z</math> coordinates of the desired camera position.
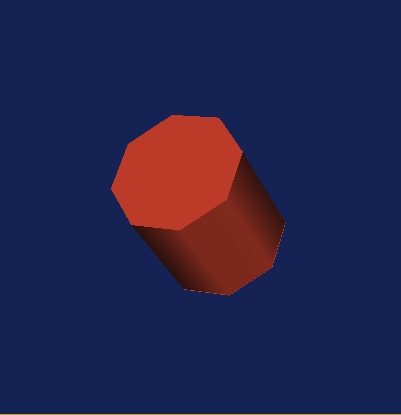
- Type 5.0, 5.0, and 5.0 into the three "Float" slots, then execute the Cylinder.vt Pipeline again; this should produce the tipped, 8-sided, tomato-colored cylinder (on a dark blue background) shown here as Fig. Cylinder01.
3. Play with the prescribed values of other method parameters:
- Click on the "vtkCylinderSource" module and note that the "SetResolution" method has a default integer value of 8; this is why the generated cylinder is not round but, instead, is 8-sided.
- Change the "SetResolution" value from, say, 8 to 20, then re-execute the Cylinder.vt pipeline.
- Drag the "SetRadius" method into the "Set Methods" window segment; type in a new value for the cylinder's radius, say, 0.25; re-execute the pipeline.
- Open up the two ends of the cylinder by dragging the "CappingOff" method into the "Set Methods" window segment, then re-executing the pipeline. (Spin the cylinder around in order to see entirely through the cylinder.)
- Click on the "vtkActor" module and note that, before the "actor" — in this case, the cylinder — is rendered and viewed by the camera, it has been rotated about the <math>x</math> and <math>y</math> axes by +30° degrees and -45° degrees, respectively. (These default values were introduced by the VisTrails authors as part of the "Cylinder.vt" vistrail in order to conform to the example cylinder rendering discussed in §4.1 of the VTK User's Guide.)
- Change the rotations to +40° (about the <math>x</math>-axis), +30° (about the <math>y</math>-axis), and -20° (about the <math>z</math>-axis), in that order.
- Click on the "vtkRenderer" module and note that the "SetBackground" method has a default (R,G,B) color of dark blue (0.1,0.2,0.4).
- Change the background color to, for example, (R,G,B) = (0.8,0.8,0.05) = yellow.
- Click on the "vtkProperty" module and note that, in accordance with the example discussed in §4.1 of the VTK User's Guide, the "SetColor" method has a default (R,G,B) color of "tomato" (1.0,0.3882,0.2784).
- Change the color that is being assigned to the cylinder to, for example, (R,G,B) = (0.05,0.9,0.1) = green.
After all of the above alterations have been made, execution of the Cylinder.vt vistrail should produce the tipped, 20-sided, uncapped, green-colored cylinder (on a yellow background) shown here as Fig. Cylinder02.
Minimalist Cube
In the above example, the vertices and polygons that were used to describe the underlying wireframe model of the cylinder were defined inside the "vtkCylinderSource" method in a manner that is hidden from the user. (Although, see our more detailed accompanying discussion.) Similarly, the VisTrails library contains methods that can be used to draw a cube (vtkCubeSource), a sphere (vtkSphereSource), or a Cone (vtkConeSource). In general, however, a user of VisTrails will want to supply her/his own data model. Here, we use the structure of a simple cube to illustrate one straightforward method of providing model data in a format that VisTrails — and, more generally, all of the vtk library modules — will understand.
Reading Cube Model from a Web Site
1. Start from scratch: Generate the "tomato-colored" cylinder depicted in Figure "Cylinder01" by following the first two steps of the "Getting Started" example presented above.
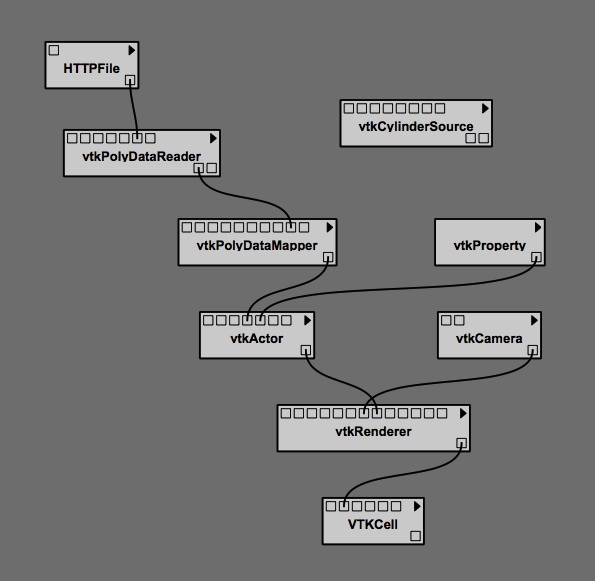
2. Disconnect the "vtkCylinderSource" module from the pipeline, then add (and connect) the following two modules to the pipeline: "HTTPFile" and "vtkPolyDataReader". This is done by finding the names of these modules in the library list shown in the "Modules" segment of the VisTrails Builder Window, then highlighting, and dragging and dropping the modules into VisTrail's Pipeline widget. After doing this, the VisTrails pipeline should look like the one depicted here as Figure "Pipeline01". (If desired, the "vtkCylinderSource" module can actually be deleted from the Builder Window.)
3. Go to the following website: http://www.phys.lsu.edu/~tohline/vistrails/datafiles/SimpleCube_step01.vtk. The information provided in this 20-line ASCII file — also displayed below as Figure "Minimalistic Cube ASCII File" — supplies the POINTS (vertices) and POLYGONS that are sufficient to define the wireframe model of a simple cube. The information in this file is identical to the first 20 lines of the example cube description shown in §15.3 (specifically, starting at the bottom of p. 331) of the VTK User's Guide.
4. Click on the "HTTPFile" module in the newly modified pipeline, then drag the "url" method into the "Set Methods" segment of the VisTrails Builder Window. Type (or cut and paste) into the space allocated for the url "String," the full "SimpleCube_step01" web address, including the "http://" prefix, as identified in step #3 above.
|
Minimalistic Cube ASCII File |
# vtk DataFile Version 2.0 Cube example ASCII DATASET POLYDATA POINTS 8 float 0.0 0.0 0.0 1.0 0.0 0.0 1.0 1.0 0.0 0.0 1.0 0.0 0.0 0.0 1.0 1.0 0.0 1.0 1.0 1.0 1.0 0.0 1.0 1.0 POLYGONS 6 30 4 0 1 2 3 4 4 5 6 7 4 0 1 5 4 4 2 3 7 6 4 0 4 7 3 4 1 2 6 5 |


