Example: Web Services
A web service grants you programmatic access to an online data source via a straightforward API. In this chapter, you will learn how to invoke web services from within VisTrails workflows. We will build a simple workflow that invokes a web service and generates an HTML table with the results. Our current example is intentionally simple; for more in-depth examples, please refer to the VisTrails website.
Where we’re going in this chapter: The European Bioinformatics Institute maintains ChEBI, [1] a database of over 15,000 chemical compounds. Each entity is referenced by a unique ID number, called its chebiID. To see an example of the kind of queries we will build in this example, go to http://www.ebi.ac.uk/chebi/webServices.do and scroll down until you find the web form labeled “getCompleteEntity.” (Figure (a) Web browser interface for the ChEBI database). If you type 15357 into the text field, it will return a long string of data in XML format about this chemical. We learn, among other things, that this chemical’s name is acetylenedicarboxylate(-2).
To try another query, scroll down to the area labeled “getOntologyChildren” and type 15357 into the text field. This returns an XML representation of this chemical’s ontology children. In this case, the result is a single chemical, acetylenedicarboxylate(-1), whose chebiID is 30782 (Figure (b) Results from a “getOntologyChildren” query).
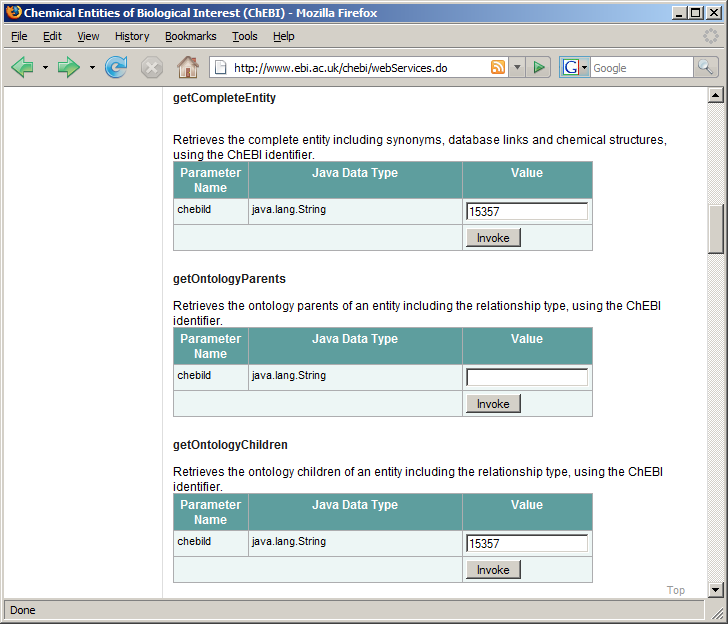
(a) Web browser interface for the ChEBI database
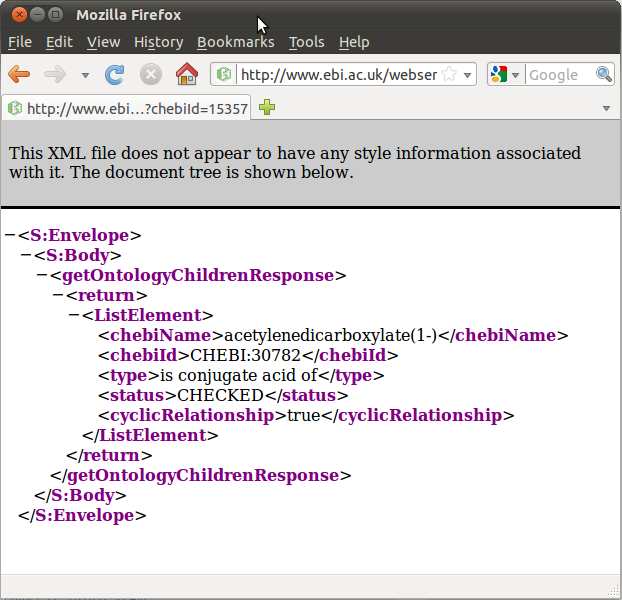
(b) Results from a “getOntologyChildren” query
In this example, we will build a workflow that accesses a web service to perform the second of these two queries. Because we’re using a web service, we don’t need a browser — we will perform this query programmatically within VisTrails.
Enabling the SUDSWebServices Package
In order to use web services in VisTrails, you need to ensure that the SUDSWebServices package is enabled in the Preferences dialog. (Please refer to Chapter Writing VisTrails Packages for more information on enabling packages.)
Adding Web Service Packages
Within the Module Packages tab of the Preferences dialog, click the Configure button to open the configuration dialog for this package (SUDSWebServices). Select the wsdlList and click on the Value field. This is where you will enter the URL(s) of the web service(s) you wish to access. If there is more than one URL, place a semicolon (;) between each URL, but not after the final URL. In other words, the URLs must be semicolon-delimited, but not semicolon-terminated.
For our example, we need the following URL:
http://www.ebi.ac.uk/webservices/chebi/2.0/webservice?wsdl
After closing the dialog, you need to reload the SUDSWebServices package in order to load the changes. Then, close the Preferences dialog. A new package will be created for each URL provided.
Alternatively, you may add a web service package by clicking the secondary mouse button on the “SUDS Web Services” package in the module palette and entering the corresponding URL. You may remove a web service by clicking the secondary mouse button on the corresponding package in the module palette and selecting Remove this Web Service.
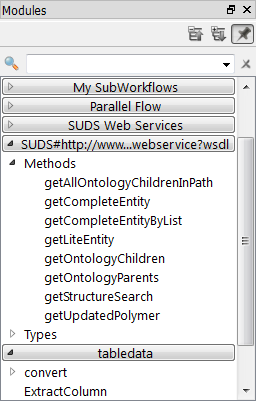
The available modules in the webServices module are shown in the Modules panel.
Creating a new vistrail
After configuring the SUDSWebServices package properly, there will be a SUDSWebServices entry in your Modules panel. The SUDSWebServices package will generate a module for each published method in a web service.
Start with a new empty workflow in the Pipeline view, and drag the following modules to the canvas.
- String (under “Basic Modules”)
- getOntologyChildren (under “Methods” for the current web service)
- getOntologyChildrenResponse (under “Types” for the current web service)
- OntologyDataItemList (under “Types” for the current web service)
- PythonSource (under “Basic Modules”)
- RichTextCell (under “Spreadsheet”)
As discussed in Chapter Creating and Modifying Workflows, PythonSource has no input and output ports by default; we need to create some. Open the configuration dialog for PythonSource by selecting this module in the pipeline canvas and typing ‘Ctrl-E’. Add a new input port named “ontologyDataItemList” of type List, and a new output port named “outfile” of type File. (Please refer to Chapter Creating and Modifying Workflows for more information about configuring and using the PythonSource module.)
We will now add some Python code to this module. This code generates a simple HTML table based on the information retrieved from the web service query. Type or paste the following source code into the PythonSource configuration dialog:
dataitemlist = self.getInputFromPort("ontologyDataItemList")
output1 = self.interpreter.filePool.create_file()
f1 = open(str(output1.name), "w")
text = "<HTML><TITLE>Chebi WebService</TITLE><BODY BGCOLOR=#FFFFFF>"
f1.write(text)
text = "<H2>getOntologyChildren Query</H2><BR>"
f1.write(text)
text = "<CENTER><table border = 1><tr><TH>ChebiId</TH> <TH>ChebiName</TH>"
text += "<TH>Comments</TH> <TH>Type</TH> <TH>Status</TH>"
text += "<TH>CyclicRelationship</TH></tr>"
f1.write(text)
for element in dataitemlist:
    if not hasattr(element,'Comments') or str(element.Comments) == '[]':
        comment = ""
    else:
        comment = str(element.Comments)
    line = "<tr><td>" + str(element.chebiId) + "</td><td>" + str(element.chebiName)
    line += "</td><td>" + comment + "</td><td>" + str(element.type) + "</td><td>"
    line += str(element.status) + "</td><td>" + str(element.cyclicRelationship)
    line += "</td></tr>"
    f1.write(line)
text = "</table></CENTER></BODY></HTML>"
f1.write(text)
self.setResult("outfile",output1)
f1.close()
Close the dialog. One of the ports we need to use is an optional port. Select the OntologyDataItemList module and select the Outputs tab from the Module Information panel. Click in the left column next to ListElement so the eye icon appears. Now connect the modules together as shown in Figure Our example pipeline.
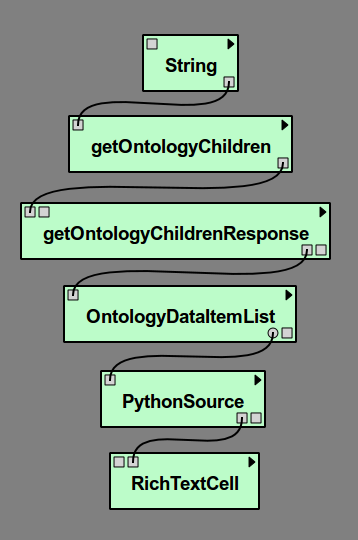
Our example pipeline
Our workflow is now complete except for one crucial element: the starting point. We need to pass a chebiID string to the workflow in order to look up information about a chemical. We do this by assigning a chebiID string to the String module at the top of the pipeline. Highlight the String module in the canvas, then in the Module Information panel on the right, make sure the Inputs tab is selected and click on value and type CHEBI:15357 into the String input box that comes up.
Executing the workflow
The workflow is now ready to be visualized. Click the Execute button to send the current pipeline with the current parameters to a RichTextCell within the VisTrails Spreadsheet. Your result should resemble Figure The HTML table generated by our workflow. As you can see, the “ontology children” query returns the same information as before, but without the use of a web browser. In addition, we used a small Python program (via the PythonSource module) to transform the raw XML into a readable HTML table.
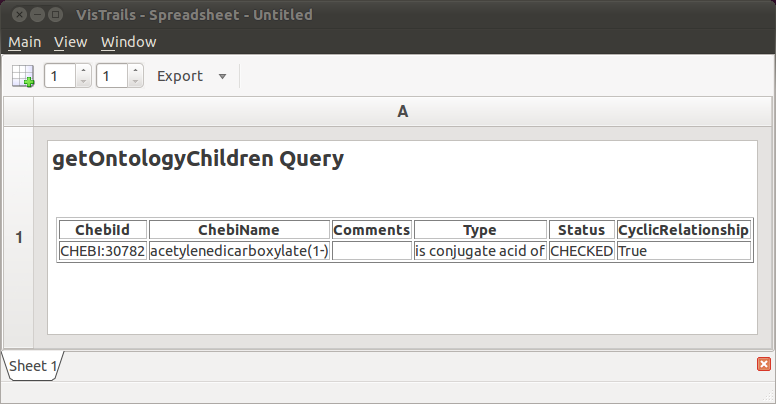
The HTML table generated by our workflow
Footnotes
| [1] | ChEBI is an acronym for Chemical Entities of Biological Interest. |